
DIY Collage Letters Wall Art
Friday, August 08, 2014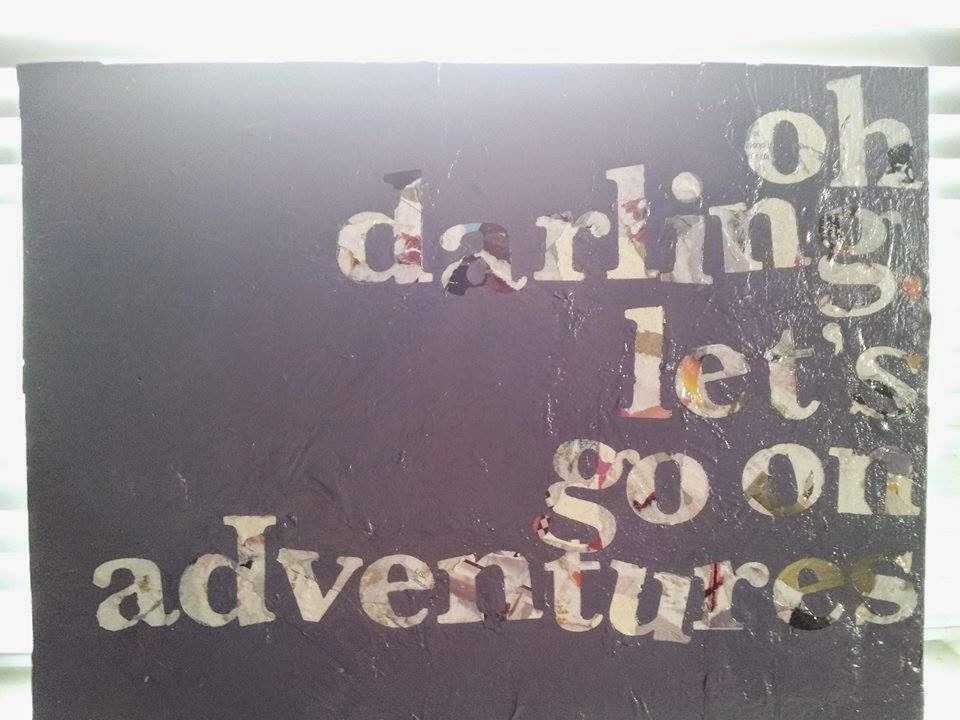


While looking for some wall art/wall decor ideas to DIY, I found THIS post from the blog Six2Eleven that shows how to make a unique quote wall art. They use the technique of using alphabet stickers, painting over them, then peeling them off, which create uniform, even letters. But they also incorporated a collage made of magazines and newspaper which I found very different and unique.
 |
| Photo credit to Six2Eleven |
I thought it was a fabulous idea, and even better since I had some old paintings I did oh so long ago that I wanted to re-purpose. It was only right for me to have a "Must. Tackle. This. Project" vibe as I got started the next day.
And then failed.
My alphabet stickers were too small for my liking, so I foolishly thought "I should cut out my own letters from printer paper and glue it on with the crappy glue sticks from school and it would be easy to remove afterwards because the glue isn't even sticky." Well let me tell you, it was crappy all right, and I ain't talkin' about the glue.
Let's just say I had to make a few adjustments, but I thought I'd make a post on it anyway. I really do suggest that you read Six2Eleven's blog post first and base your project on their instructions, then come back and read mine if ever you're like me and mess up haha.
 |
| Sky Blue and Black paint - Michaels, Red, White and Navy Blue paint - Walmart Sheer White and Yellow Paint - Dollarama (it's sheer because it's cheep) Clear spray paint - Jo-Ann Mod Podge - Walmart Painter knife - Dollar Store Large paint brush - Dollarama Sponge brush - Walmart Detail "Liner" brush - Jo-Ann Alphabet stickers - Walmart |
Supplies You Need:
- A large canvas, a used or brand new one.
- Alphabet stickers in your preferable size
- Craft glue, like Mod Podge
- Paint brush or anything to apply glue
- Old newspapers, magazines, etc.
- Acrylic paint (or anything similar) in the colour of your choice
- Sponge brush or large paint brush
- Small detail brush (optional)
- Painter knife
- Clear spray paint to seal in final product (optional)
When I did this the first time and messed up, I was already close to finishing. All I had to do was remove my letters and I would be finished, but obviously I couldn't since I kinda accidentally glued the letters down...
To start off the project the original, Six2Eleven way, simply create a collage out of ripped pages of newspaper and magazines. I used a wet brush to apply glue to add extra texture when the paper dries, as well as kept some corners folded. Here's a photo from Six2Eleven:
 |
| Credit to Six2Eleven |
At this point in the original version, you would take your alphabet stickers and stick them on the canvas to spell out your quote, then painting the entire canvas. But I ended up ripping it all off anyways, so just skip this step.
 |
| Removing the original collage with a painter knife. |
When I wanted to start over, I used my painters knife to slide between the canvas and the collage to try and pry it off. Seems like I don't really have much luck with un-glueing things because no matter what I did, some parts could not be removed! I started to like the distressed and ripped look that resulted, so I thought I'll just carry on from here instead of covering it with a whole new collage.
After "distressing" your collage, glue some discarded pieces to sections where the canvas can be seen, or where you want extra texture. After I was finished, I put a layer of glue over the entire collage to seal it in, so that the stickers wouldn't rip the collage. I found out doing that brought it's own set of challenges, so it's up to you if you would like to do that.
 |
| My finished alternate collage. |
While that dries, pick out the letters needed for your quote. I chose "oh darling, let's be adventurers" as my quote, but then later changing it to "oh darling, let's go on adventures" because for some reason, I couldn't find another "R".
 |
| No room on my desk, so I used my pillow. |
Once the glue has dried completely, (it's not coooompleeetely dry, the letters will get a bit more stuck on then you would like and you're gonna have some serious issues. Yes, that was one of the "challenges" I was talking about ugh) go on and stick your letters. Paint the entire canvas using a sponge brush, being extra careful and using a dabbing motion when painting over letters.
 |
| To make the greyish-purple used (in case you were wondering): about 1 part white, 1/4 part red, 1/4-1/3 part navy blue, few drops of black to make it grey-toned, a few drops of sheer yellow to make it browner. |
Let that dry up for a few hours. Go read a book or eat or something and check on it in at least 4 hours.
When it's all dried up, carefully peel the letters off. If you got some paint that bled inside the letters, then just take some slightly sheer white paint and use a detail brush to paint over the mistakes. You can also do the same with the paint you used to cover the canvas to define your letters.
 |
| How to cover up paint bleed. |
Once you're satisfied, you can either bring it outside and spray a clear coat, or YOU'RE DONE!! YAY!
Here's my finished product!
 ✖
✖
And now for a POST PUN!!
 |
| via The Supergeek Chronicles |


0 comments